Guidelines on Setting Up Automated Irrigation or Lighting Systems for Flower Gardens
If you’re passionate about flowers but don’t always have time to water or tend to your garden, automation might be the upgrade your green space needs. Whether you have a sprawling backyard or a small balcony garden, setting up automated garden systems allows you to enjoy thriving, colourful blooms with less effort. With a little know-how, even beginners can use affordable and accessible technologies like smart timers, solar-powered lights, and drip irrigation kits to care for their plants efficiently.

This article breaks down irrigation and lighting, the two most popular forms of garden automation into detailed, beginner-friendly guides. So whether you want to keep your daisies hydrated or show off your roses at night, this guide will help you modernise your garden in a few simple steps.
Why Set Up a Smart Flower Garden?
Caring for flowers is a joy, but it’s not always easy to keep up with watering and maintenance between work, holidays, and unpredictable weather. That’s where automation steps in. A smart flower garden setup allows you to delegate key tasks like watering and lighting to tech-enabled systems that work quietly in the background.
By automating your garden:
- You ensure your flowers are watered consistently and at optimal times.
- You save water by targeting only where and when it’s needed.
- You can leave town without worrying your flowers will suffer.
- You add visual appeal and safety to your outdoor space with well-placed lights.
- You embrace eco-conscious solutions such as solar power and rain sensors.
- Whether you’re a busy professional, a weekend gardener, or someone with limited mobility, automated systems make gardening more enjoyable and sustainable.
The Benefits of an Automated Irrigation System for Your Flower Garden
Investing in an automated irrigation system for your flower garden may seem like a luxury at first, but it quickly becomes an essential part of garden care, especially in the face of unpredictable weather and busy schedules. Here’s why it makes such a difference:

1. Consistent Watering for Healthier Blooms
Flowers thrive on consistency. Watering too much or too little can lead to drooping, disease, or even root rot. An automated irrigation system ensures your plants receive the right amount of water at regular intervals, which is especially important for delicate blooms or newly established plants. The steady delivery of moisture directly to the root zone helps promote stronger, more resilient flowers.
2. Water Efficiency and Sustainability
Traditional watering methods, such as hand-held hoses or sprinklers, often result in water waste due to evaporation, runoff, or overwatering. Drip irrigation systems are far more efficient, delivering water exactly where it’s needed, at the base of each plant. This makes it an eco-friendly choice, particularly in Australia, where water conservation is a growing concern. Smart timers and rain sensors can further reduce waste by adjusting the schedule based on weather conditions.
3. Time-saving and low-maintenance
Once set up, an automated system takes the daily task of watering off your plate. Whether you’re travelling, working long hours, or simply enjoying a lazy Sunday, your garden will stay cared for without any extra effort. These systems are generally low maintenance too — with just occasional checks to ensure everything’s running smoothly.
4. Ideal for Urban Living and Busy Lifestyles
If you live in an apartment or have a small courtyard garden, an automated irrigation system allows you to manage your plant care efficiently in a confined space. Smart irrigation kits are perfect for balcony containers, vertical planters, or windowsill herb gardens. You’ll spend less time juggling watering cans and more time enjoying your flowers.
How to Set Up an Automated Irrigation System for Your Flower Garden
Automated irrigation is a game-changer for flower gardens, particularly in Australia where dry spells can affect plant health. A drip irrigation system, when connected to a smart timer, delivers water slowly and directly to the base of each plant, minimising evaporation and waste.
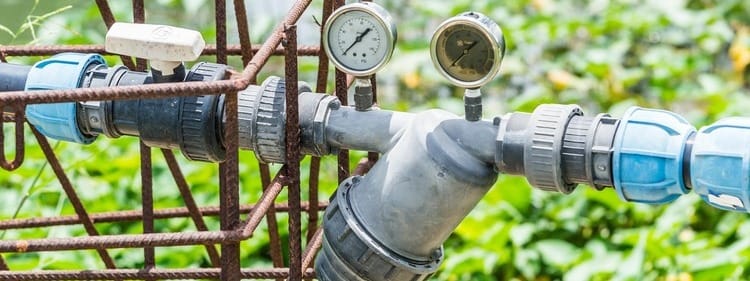
Image by toodlingstudio from Pixabay
Step 1: Map Out Your Garden and Needs
Start by walking through your garden and taking stock of your setup. Note where your tap or water source is, how many pots or flower beds you want to cover, and whether your plants have similar watering needs. If you’re working with a small balcony or raised bed, take measurements, this will help when buying materials.
Make a simple sketch or take a photo and mark where each plant is located. This will guide your tubing layout and help you estimate the number of drippers and connectors needed.
Step 2: Choose and Assemble Your Irrigation Kit
Most garden centres sell complete drip irrigation kits, which usually include flexible tubing, drippers, stakes, connectors, and sometimes a pressure regulator and filter. Make sure the kit is the right size based on your garden’s dimensions. Urban gardeners with pots may need a micro-drip system, while larger spaces may benefit from standard drip lines.
Connect the tubing according to the instructions, laying out the main supply line and cutting smaller lengths that will feed individual plants. Attach drippers to each end and secure the tubing with stakes to prevent movement.
Step 3: Connect the Automated Irrigation System to a Smart Timer
The smart timer is probably the most important part of the automated irrigation setup. This device connects to your outdoor tap and controls when and how long your plants are watered. Some timers are Wi-Fi enabled, allowing you to program watering schedules via a smartphone app, while others use a digital interface.
Install the timer between your tap and the tubing. If your kit didn’t come with a pressure regulator or filter, consider adding one to protect the drippers from blockages caused by debris or excessive water pressure.
Once connected, test the system to make sure all drippers are working and adjust the flow rate if needed.
Step 4: Set Your Schedule and Monitor Performance
Use the app or built-in timer to create a watering schedule. Early morning is generally best, as it reduces evaporation and allows leaves to dry during the day. If your timer connects to weather data, you can set it to skip watering on rainy days or reduce frequency during cooler months.
Make a habit of checking the system every few weeks to ensure there are no leaks, blockages, or dislodged emitters. With minimal upkeep, your garden will continue to thrive even when you’re not around.
The Benefits of Installing Automated Lighting in a Flower Garden
Lighting isn’t just about aesthetics, although that’s a huge perk. Automated lighting systems bring a range of practical and emotional benefits to your flower garden, turning it into a truly multi-purpose space.
1. Showcase Your Flowers After Dark
Some flowers are at their most beautiful in the evening hours and automated lighting ensures their charm isn’t lost to the night. Spotlights or uplights can be used to highlight feature plants, trellises, or ornamental trees, turning your garden into a glowing focal point once the sun goes down. This is particularly useful when entertaining outdoors, creating an inviting atmosphere for guests.
2. Extended Use of Outdoor Spaces
Smart lighting can turn your garden into an evening retreat, allowing you to unwind with a book, host a barbecue, or enjoy a glass of wine among your blooms, even after dark. Warm-toned LEDs, fairy lights, and path lights work together to create a soothing and practical space you can enjoy in the evenings.
3. Increased Safety and Security
Proper lighting around your flower beds and walkways improves visibility, helping to prevent trips and falls. In urban areas or near the home, lighting also acts as a security feature by discouraging unwanted visitors and making your property feel more secure.
4. Energy-Efficient and Easy to Manage
Modern garden lights, especially solar-powered models, are highly energy efficient. They require minimal electricity or none at all, charging via sunlight during the day and switching on automatically at night. Smart lighting systems give you even greater control, allowing you to adjust schedules or brightness from your phone. This combination of convenience and efficiency makes automated lighting an excellent investment for any flower garden.
How to Install Automated Lighting in a Flower Garden
Lighting is often overlooked in garden care, but it can transform your space into a magical retreat. From showcasing your favourite blooms at night to improving safety and ambience, automated garden lighting systems are both practical and beautiful. Thanks to advances in solar and smart technology, adding lighting has never been easier — even for renters or small-space dwellers.
Step 1: Choose the Right Type of Lights
Begin by considering how you want your garden to look at night. Spotlights are ideal for highlighting larger plants or features like trellises, while path lights gently illuminate edges and walkways. If you’re after a relaxed, festive atmosphere, string lights can be draped over fences or pergolas.

Image by hartono subagio from Pixabay
Solar-powered lights are the most convenient option, especially for renters or those without access to outdoor power points. They absorb sunlight throughout the day and switch on automatically as evening falls. For more customisation, smart lighting systems allow you to adjust brightness, timing, and even colour using your phone.
Opt for lights designed to withstand the elements and perform reliably outdoors. If you live in a coastal area, make sure the materials are rustproof.
Step 2: Plan Your Layout and Installation
Walk through your garden at dusk to see where lights would make the most impact. Think about safety, such as lighting a step or dark corner, as well as aesthetics. It’s best to space lights evenly and avoid pointing them directly at eye level, which can create glare.
Once you've decided on the placement, install each light according to the product instructions. Solar lights are typically pushed into the ground with built-in stakes, while wired LED lights may need to be mounted or secured with clips. For wired setups, you’ll also need to run a low-voltage cable and connect it to a transformer plugged into a power point.
Be sure to position solar panels in a spot that receives at least six hours of sunlight per day for optimal performance.
Step 3: Automate Your Lighting Schedule
If you're using solar lights, many will automatically turn on and off based on light levels. However, some models come with settings that allow you to control brightness or duration manually.
Smart lighting systems offer greater flexibility. Using apps like Google Home or compatible lighting apps, you can set schedules, change the mood with different colours, or even sync your lights with other smart devices. Some systems allow voice control via Alexa or Google Assistant, making your garden setup even more hands-free.
Real-World Tips for Urban and Small-Space Gardeners
Photo
Urban living doesn’t have to limit your garden ambitions. In fact, automated garden systems are ideal for small balconies, patios, or even indoor plant shelves.
When space is limited, try using vertical planters or hanging pots with drip emitters installed at the top. Gravity will help water trickle down, keeping lower plants hydrated too. Smart timers with multiple zones are perfect for separating plants with different needs, for instance, succulents vs. thirsty flowering plants.
For lighting, consider clip-on solar lights that attach to balcony railings or fence posts. Wall-mounted smart lights can also illuminate garden nooks without taking up floor space.
Choosing the Right Smart Garden System for Your Space
Before diving into installation, it’s worth taking a moment to consider which automated garden systems are best suited to your specific flower garden. Not all systems are created equal, and what works for a large suburban garden might not be ideal for a compact city balcony.
Assessing Your Garden's Needs
Begin by considering how you interact with and enjoy your garden space. Do you have flower beds that span several metres or a handful of pots on a small patio? Are your plants sun-lovers that need daily watering, or are you growing hardy native species that thrive with minimal attention?
A larger garden with diverse plant zones might benefit from a multi-zone irrigation controller and wired lighting systems with a central transformer. On the other hand, a balcony garden may only need a basic drip kit with a single smart timer and a few clip-on solar lights.
Climate and Sunlight Considerations
Australia’s climate can vary greatly depending on your region. In hot, dry areas, a smart irrigation system with weather-based adjustments can prevent overwatering and reduce stress on water resources. In cooler or wetter regions, lighting might play a bigger role in your garden’s usability, especially during shorter winter days.
Also consider your garden’s exposure to sunlight, particularly if you’re relying on solar-powered lights or hoping to install solar irrigation controllers. South-facing spaces or shaded areas might need wired alternatives or battery backups to stay reliable.
Compatibility with Smart Home Devices
If you're already using a smart home ecosystem like Google Home, Amazon Alexa, or Apple HomeKit, it’s worth choosing irrigation and lighting systems that can integrate seamlessly. This makes it easier to control everything from a single app or through voice commands.
By selecting tools that match your garden’s scale, climate, and existing tech, you’ll avoid frustration and make the most of your smart flower garden setup.
Maintaining Your Automated Garden Systems for Long-Term Success
While automated irrigation and lighting systems are designed to reduce manual work, they’re not completely “set and forget.” A bit of seasonal maintenance will go a long way in keeping your smart flower garden setup running smoothly and your flowers looking their best all year round.
Keeping Your Irrigation System in Top Shape
Over time, drip emitters can become clogged with mineral deposits or soil particles, especially if your water source isn’t filtered. To prevent this, check your system every few weeks during peak watering seasons. Run water through the lines and inspect the emitters for blockages or uneven flow.
At the end of each growing season, flush the entire system with clean water and consider removing and storing any removable parts if frost is a concern in your region. Replace worn tubing or cracked connectors as needed, most components are inexpensive and easy to swap out.
If you're using a smart timer, check that the app or controller is still properly connected to Wi-Fi and that seasonal schedules are updated. Some systems allow for seasonal adjustments automatically, but it’s still good practice to review your settings at least quarterly.
Caring for Your Garden Lighting
Solar garden lights require little upkeep, but the solar panels can get dusty or shaded over time. Gently wipe the panels every few weeks to ensure they’re charging efficiently. In winter or during extended overcast weather, solar lights might become dim or temporarily stop working. This is normal, but you can extend runtime by repositioning panels for better sun exposure.
For wired systems, inspect cables and connectors periodically to make sure they’re secure and not exposed to the elements. Smart lighting apps may receive updates, so keep an eye out for new features or improvements to scheduling, dimming, or colour control.
Keep It Simple: Set a Monthly Reminder
The easiest way to stay on top of maintenance? Set a recurring reminder on your phone or calendar once a month. A 15-minute check-up is usually all it takes to avoid bigger problems and ensure your automated garden systems continue supporting your flower garden year-round.
Final Thoughts: Let Technology Help Your Flowers Thrive
Setting up a smart flower garden doesn’t require a background in tech or a big investment. With just a few tools and a weekend afternoon, you can transform your garden into a low-maintenance, high-reward space that keeps blooming, no matter your schedule.
Automating your watering and lighting not only keeps your plants healthy but also reduces waste, saves time, and lets you enjoy your garden whenever you want, day or night. So, whether you’re growing native wildflowers, delicate petunias, or a mix of perennials, it's time to embrace the benefits of a smart flower garden setup.